.png")


Play-Doh Brand How To: make a bunny
Hop to it! A little Play-Doh compound and some creativity make a hippity-hoppity pal in minutes. After you and the little buns finish molding and crafting, add some fun accessories with some more Play-Doh colors! We can think of a few, like a crazy carrot or maybe an Easter egg. Create the bunny using the steps below and see where it takes their imaginations!
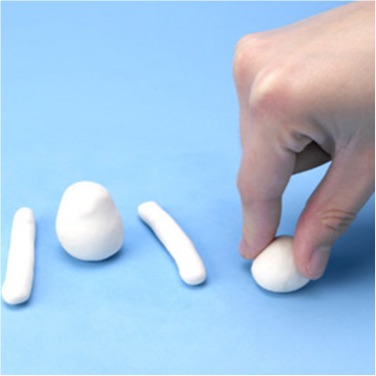 | mold the bunny’s bodyOur fluffy bunny’s body will require some white Play-Doh compound. Mold some into an oval (or egg) shape, large enough to hold its head and legs. Mold another, smaller oval out of white Play-Doh compound for its head. Stretch two pieces of white Play-Doh compound into two cylinders. |
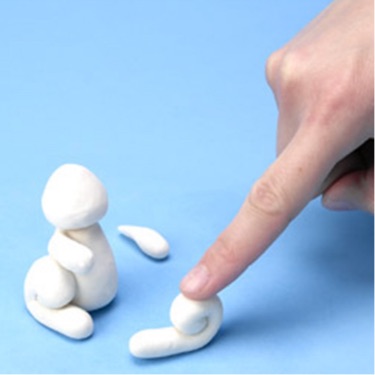 | make legs and armsThose two white cylinders they made? Let’s roll ’em up three-quarters of their length to make some legs and bunny feet, then stick them to both sides of the larger oval. Mold two shorter cylinders from white Play-Doh compound and stick those just above the rolled-up legs. Take the smaller oval and center it atop the large oval. |
 | ears, eyes and noseLet’s take some pink, white and blue Play-Doh compound to make the rest of this bun-bun. Mold floppy ears out of white Play-Doh compound and shape pink Play-Doh compound inside the white ears. Roll two small blue eyes and a pink nose. Place the ears on both side of its head, place the nose just below the center of its face and eyes above the nose. |
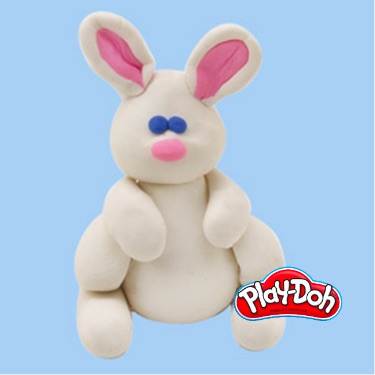 | hare-raising fun!Their cute bunny is complete! Add it to their other Play-Doh compound creations for a new fun partner in play. Show it off, hop along or smush it all up for another creation. |